.png)

Tutorial-How To Create And Manage Prodcts With Woommerce
Tutorial: How to Create and Manage Products With WooCommerce- Are you looking for a tutorial that guides you on How to Create and Manage Products With WooCommerce? We have the complete tutorial here for you.
First, what is WooCommerce? WooCommerce is a free eCommerce plugin that allows you to sell anything online. Built to integrate seamlessly with WordPress platform, WooCommerce is the world’s favorite eCommerce solution that gives both store owners and developers complete control.
Now, log into your dashboard and let’s go!
Adding a Product
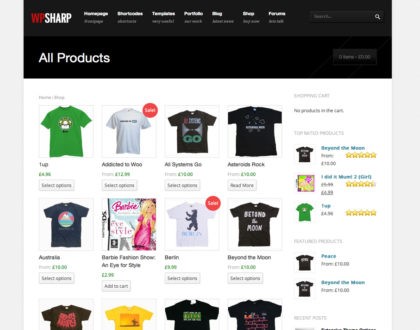
Click on Products. This will take you to the page that lists all the products in your shop. At this point it will naturally be empty.
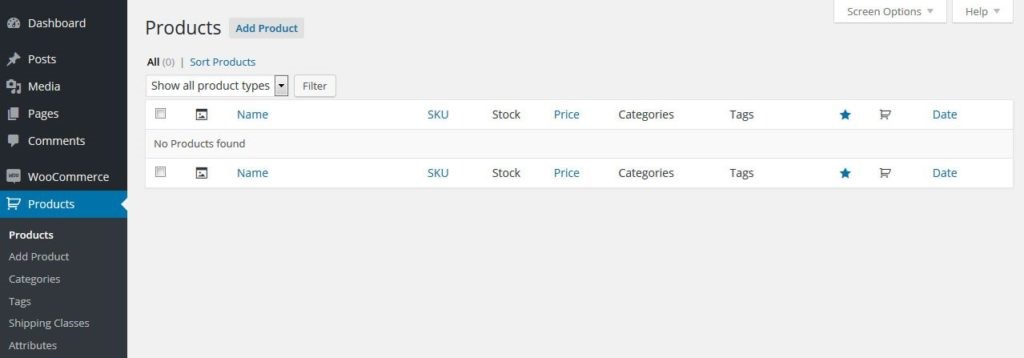
By clicking Add Product at the top or in the menu on the left you can start creating one.
The following screen will look very familiar. It is basically the normal WordPress editor with a number of additional options.
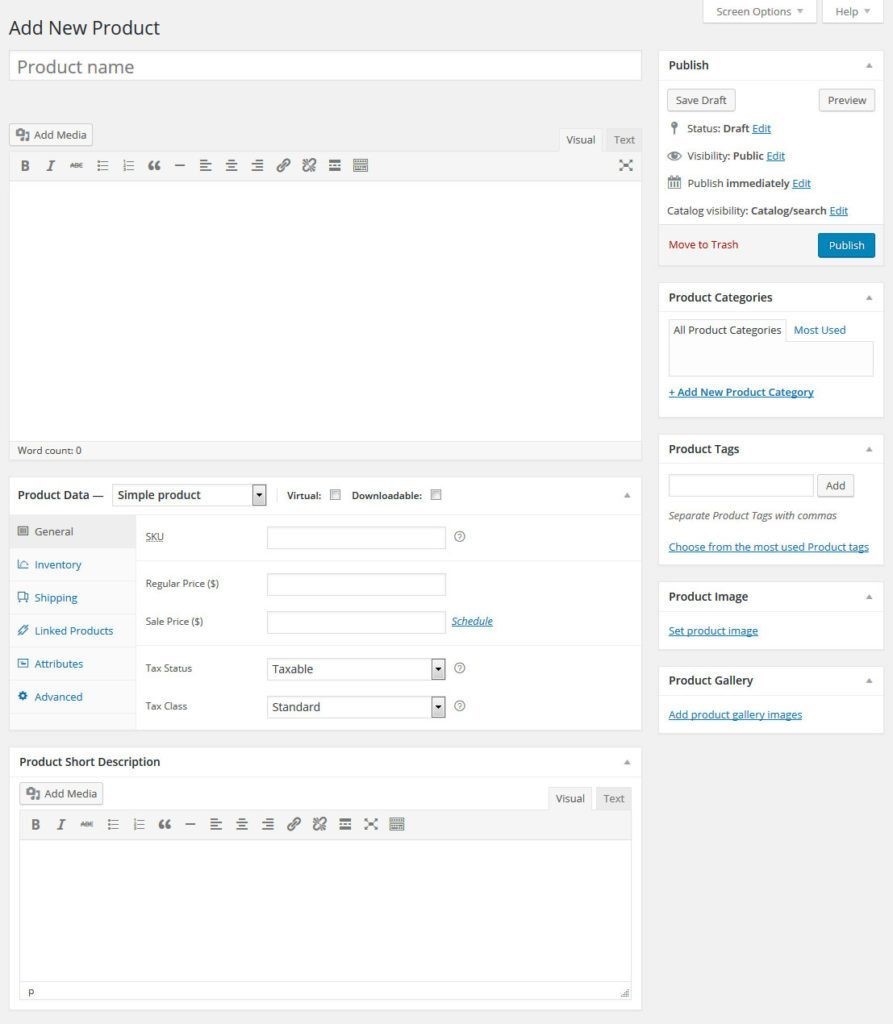
At the top of the screen you can give your product a title and add a description like in a normal post. This includes images and other media. The information here will appear on the main product page.
There are also a few other options that are very similar the ones found for posts and pages:
- Product Categories: Create and assign categories and subcategories to order your products and make them easier to browse.
- Product Tags:Distinguish products even further with tags.
- Product Image:Works like a featured image. Whatever you upload here will automatically be spit out on the product and shop page.
- Product Gallery:In addition to the product image you can also add an image gallery, for example to show different product variations, different angles and more.
So far so easy, however, the product creation screen has additional important options.
Configuring Product Data
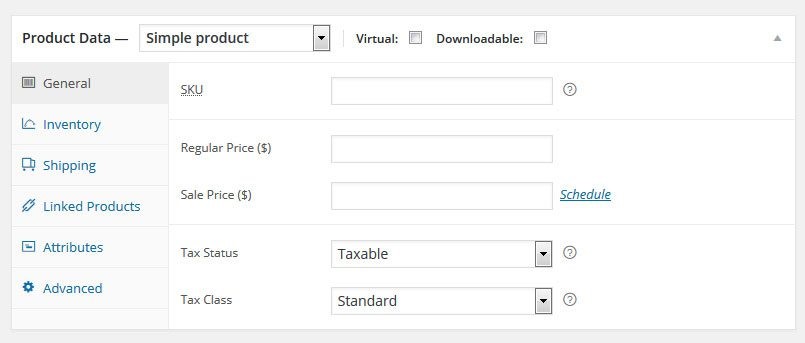
Below the main editor you will find a panel for additional product data. For your shop to work, it is crucial that you fill this in.
First, you need to choose which type of product you are selling from the following options:
- Simple product
- Grouped product
- External/Affiliate product
- Variable product
Depending on what you pick, the configuration options will change. Overall, you can configure these settings:
- Virtual/Physical: If what you’re selling is not a real-life product but software of some sort, check this button. It will also remove the shipping options.
- Downloadable:In addition to that, you can determine whether your product is downloadable, upload the file and add information as well as download conditions.
- General:Give your product a Stock Keeping Unit (unique ID, mandatory), provide product URLs and button text for affiliate products, price and sales price (if applicable) as well as the date range for any upcoming sales. You can also set up whether it’s a taxed product as well as its tax class.
- Inventory:Determine whether the product is in stock and — if it’s a physical product — note down the quantity available and whether you accept backorders.
- Shipping:Weight, dimensions and shipping classes are configured here.
- Linked Products:In this menu you can include related products that will get recommended as up-sells or cross-sells and create product groups.
- Attributes:This is where you define custom product attributes like color, size, etc.
- Variations:When you have set up attributes, this menu allows you to offer variations of your goods.
- Advanced:Here you can add a custom purchase note that will be sent to customers after purchase, change the product order inside the menu and determine whether to allow reviews.
- Location Settings:Control the base location of your store, choose the countries you sell to or set to worldwide and create example address details for customers
- Store Notice:Display a site-wide notice text for all customers
- Currency Settings:Set the currency you will be paid in, change the currency format, thousand separator, decimal separator and how many decimals to display after the comma
- General:Change weight and dimension units as well as settings for product reviews, ratings and who can leave them
- Display: Determine the shop page and whether or not to display categories, change the category archive design as well as product order, shopping cart behavior and image dimensions
- Inventory:Enable or disable stock management, how long to hold unpaid orders, notifications for low-running stock and their recipients as well as stock thresholds and inventory display on page
- Downloadable Products:File download delivery method and access restriction for downloadables
- Tax Options:Enable and disable taxes globally, determine whether to use net or gross prices, configure the calculation method for product and shipping taxes, set up the rounding method, add tax classes, configure the price display in the shop and how to show tax totals
- Standard Rates:Set up different tax rates to use in your shop
- Reduced Rate Rates:Same for reduced rate items
- Zero Rate Rates:Same for tax-free items
- Checkout Options:Enable and customize coupons, whether to enable guest checkouts and SSL, configure checkout pages including terms and conditions, define checkout endpoints for processing and available payment gateways
- BACS:Enable and disable bank wire transfers and customize user messages as well as bank connections
- Cheque: Cheque payment options including description and instructions
- Cash on Delivery:Determine whether to accept cash on delivery, for which shipping methods and give instructions for clients paying cash
- PayPal:PayPal payment options, credentials, testing and debugging, advanced options and API settings
- Simplify Commerce:Settings for the Simplify Commerce payment gateway
- Shipping Options: Define how to calculate shipping costs, set shipping/billing address as well as shipping locations and methods
- Flat Rate:Configure fixed rate shipping
- Free Shipping:Options and requirements for free shipping
- International Flat Rate:Offer and configure fixed rate shipping for overseas
- Local Delivery:Whether and where to offer local delivery
- Local Pickup:Customers that are eligible for local pickup if at all
- Account Options:Determine where users can check their account info, define unique identifiers for different actions on the account page, enable customer registration in different places and whether or not to automatically generate customer user names and passwords
- Email Options:Determine the recipients and content of different important checkout email notifications, sender names and email addresses and configure the email template (header image, footer text and color scheme)
- API Settings —Enable/disable the WooCommerce REST API, set up endpoints and permissions for external applications to access your shop data and create event notifications for integrating third-party services
The final step is to fill in the short description at the bottom of the screen. The content entered here will show up under the product title.

When you have set everything up, the finished page will look like this:
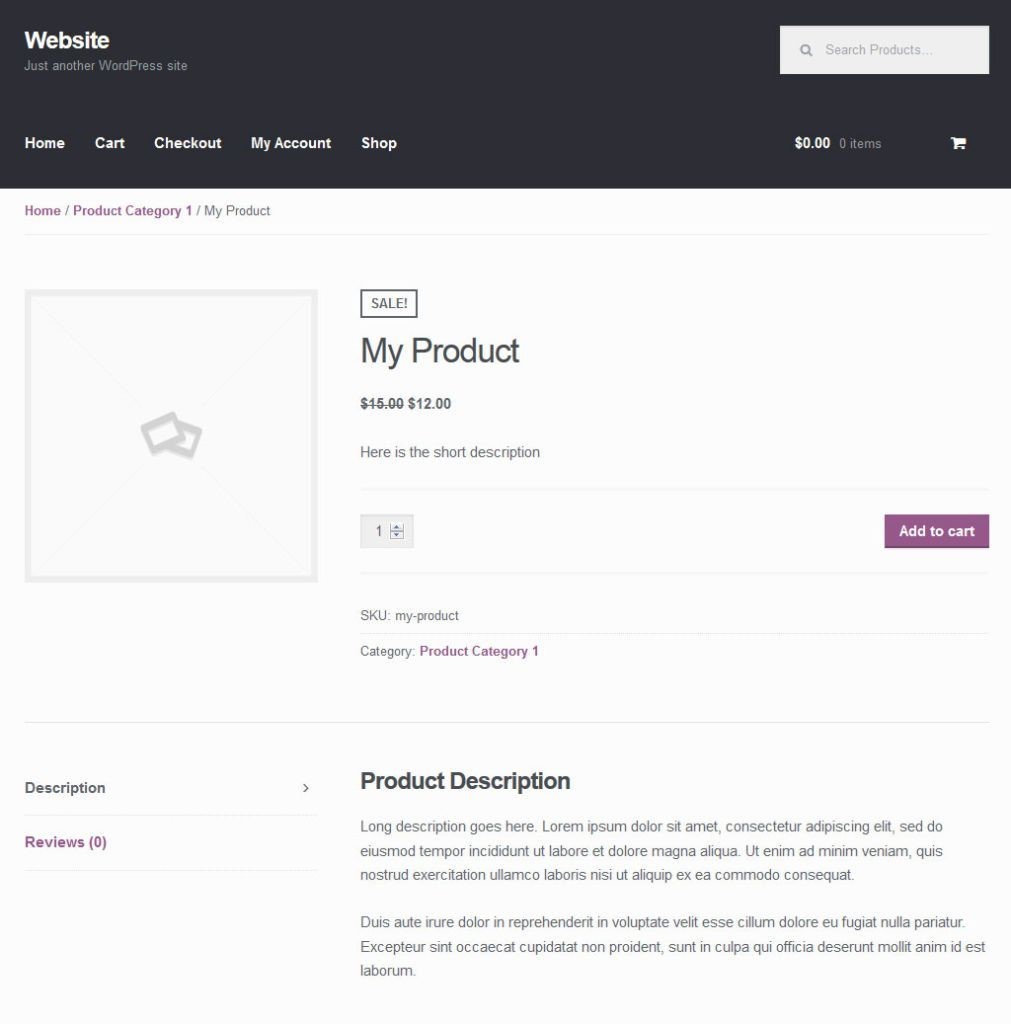
Congratulations, you created your first product with WooCommerce and can now access it from the Products menu.
Other Product Settings
The other items in the Products menu are pretty straightforward.
If you have used WordPress before, categories and tags should be second nature to you. The only difference worth mentioning is that in WooCommerce you can add thumbnail images to product categories.
What should also be brought to attention are the other two menus for additional product data named Shipping Classes and Attributes.
The first one allows you to create product groups by shipping and can be used for calculating shipping costs by class.
I already mentioned attributes above and in the corresponding menu you may create sizes, colors and other characteristics that can be added to products as variations.
All clear so far? Then let’s move on to other things.
Managing WooCommerce
From here on out we will look at the menus available under WooCommerce. I’ll explain each and every menu item one by one so you know exactly what’s going on there.
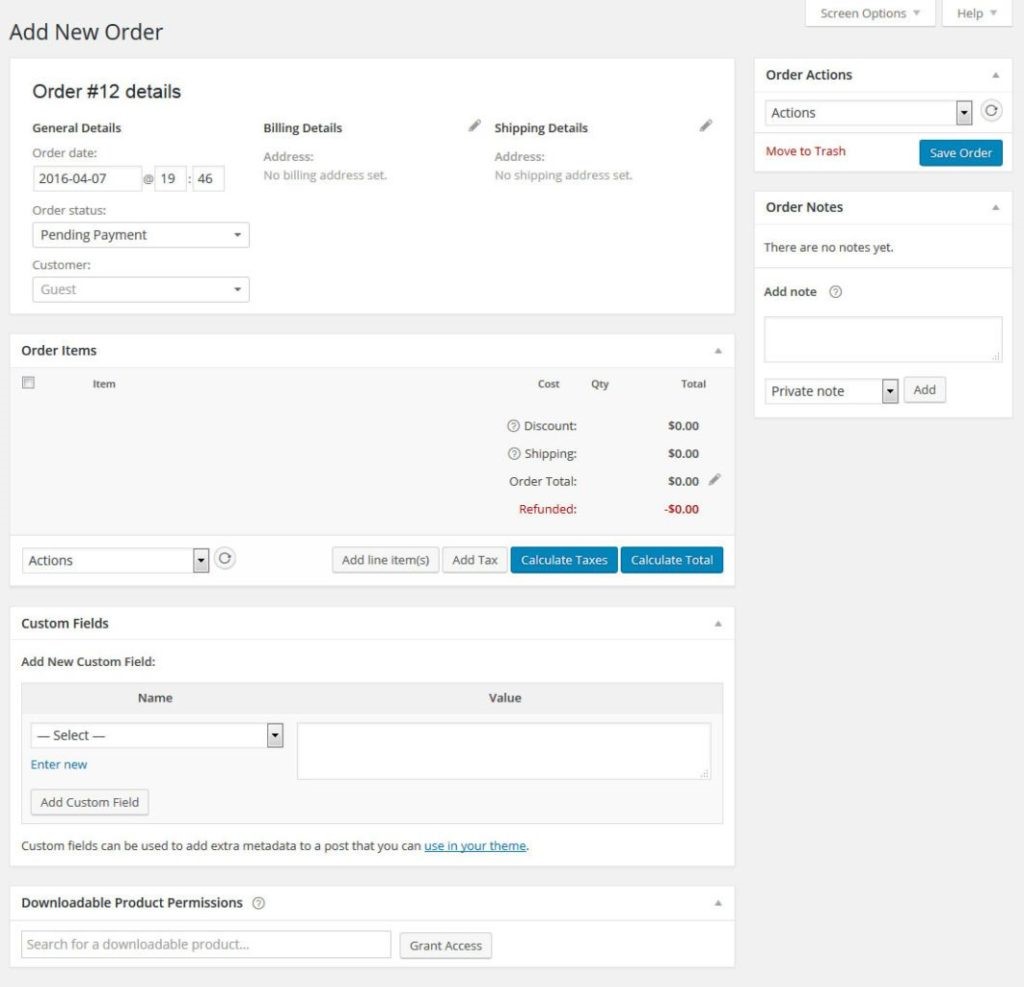
Orders
As you can imagine, this screen shows the current order status of your shop.
If you are strictly dealing in digital products there isn’t much to see here except for how many products you are currently slinging and who bought what.
Physical goods on the other hand can be sent on to shipping and have their order status changed (pending payment, on hold, refunded, failed, etc.).
You can also modify billing or shipping addresses, resend order emails, add notes, change the content of the order and more.
Coupons
This part should also be a familiar concept. Under Coupons you may create and manage discount codes.

Determine the type and amount of discount, set expiration dates, restrict usage (for example, in conjunction with other coupons) and set limits on how many coupons can be used overall or per user.
Easy peasy.
Reports
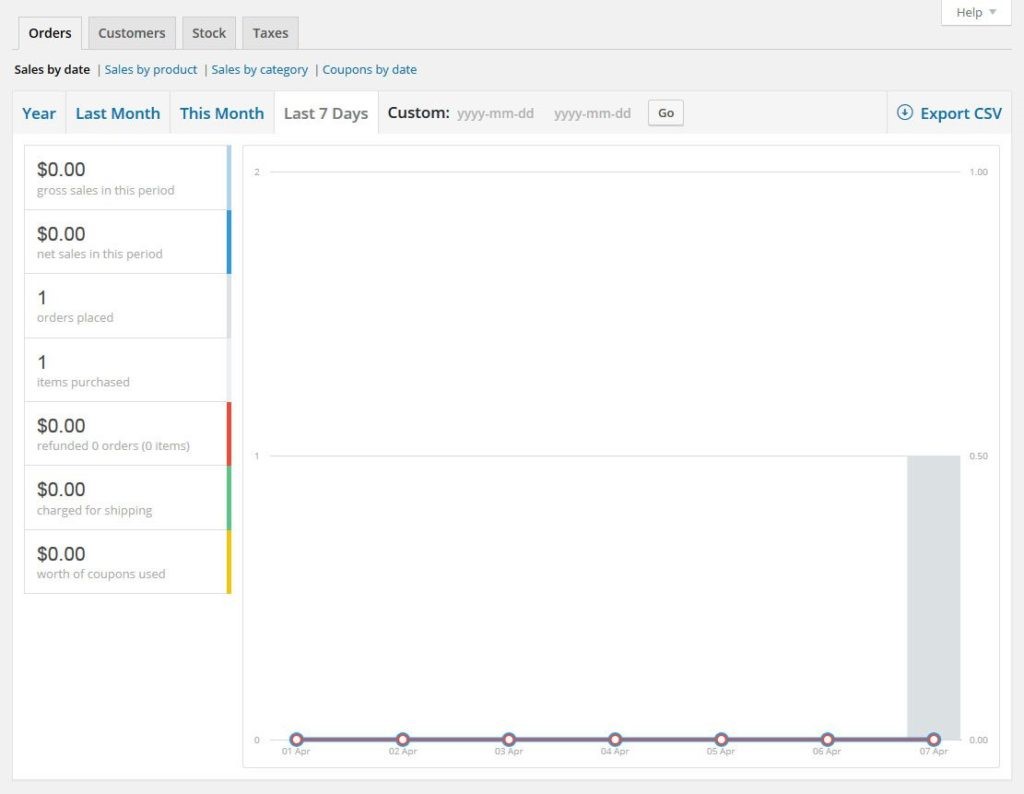
Here’s where it gets really interesting. In my personal opinion, the report section is one of the highlights of WooCommerce.
The plugin automatically creates detailed summaries on every aspect of your shop. You know what they say, “what gets measured, gets managed” and WooCommerce definitely takes care of the measuring part.
Check gross and net sales of the last seven days and other time frames, view orders placed, items purchased, refunds issued, shipping costs taken in and coupons used–all at a glance.
Yet, it doesn’t stop there. The same overvoew is available for customer sales, product stock and taxes and can be exported in CSV form to import into your own books.
Settings
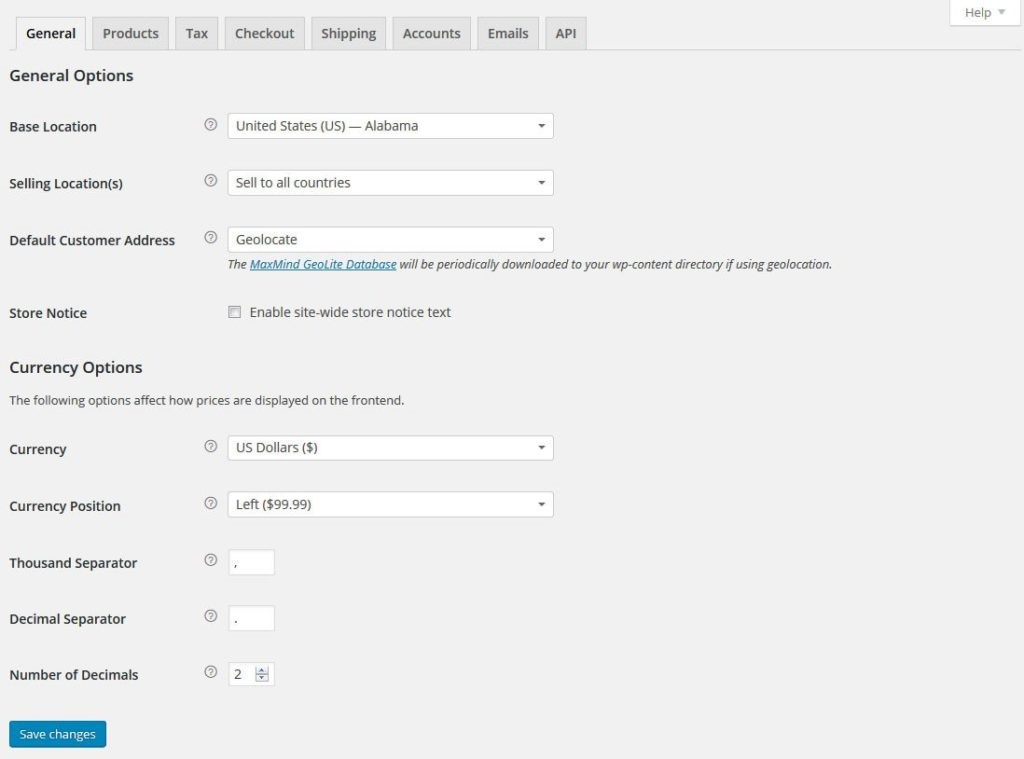
This section is where you control quite literally every aspect of your WooCommerce online store.
Even the free plugin version offers loads of configuration options and I will go over them briefly to give you a good understanding of WooCommerce’s customization capabilities